Troubleshoot
Last changed: 2026-10-13
No connection initially after the instance is set up and started
Sometimes whan a new instance is created it is not possible to get a connection to it, neither using ssh nor ping (icmp). Especially the very first time one is trying out the NREC service, some parts may be confusing. Here are a couple of steps one might use to try to remedy the situation and/or get a better understanding of the basic network concepts.
Private IPv4 / Instance using the ‘IPv6’ network
When one defines the new instance, there is a choice between several networks: IPv6 and dualStack. The names are not strictly accurate, and the differences can be described thus:
Network name |
IPv4 |
IPv6 |
|---|---|---|
IPv6 |
Private IPv4 address in the 10.0.0.0/8 range |
Public IPv6 |
dualStack |
Public IPv4 |
Public IPv6 |
As can be seen from this table, both cases yields both an IPv4 and an IPv6 address. But note that the IPv4 address assigned in the IPv6 case is a private address (so called RFC1918 address) which is not reachable from outside the project! If the instance is using the IPv6 network, then you must use IPv6 to get to it! The IPv4 address is NOT reachable from your own machine. If you try accessing your new instance on an address starting with ‘10’, then this is the reason for not getting any response.
Solution: Use its IPv6 address for connection
No connection using IPv6
Your instance is always assigned an IPv6 address. If you try to get a conenction to the instance using this address, and you get No route to host or otherwise no response, then verify that you have a proper IPv6 address on the system you connect from.
Note
If the only IPv6 address you have is something which starts with fe80 - and no other IPv6 address, then you just have the so called link-local address. This is NOT a public IPv6 one, and usually this address is not suitable for traffic to anything beyond your local network.
Solution: Check your assigned IPv6 address, and if none assigned or just assigned a link-local, then either go through a IPv6 enabled host ( like login.uib.no or login.uio.no ) or switch to IPv4 (and then make sure your instance is using dualStack, as descibed in the previous section).
Still no connection
Every instance is implicitly attached a firewall, which by default only let traffic from instances in the same project through. All traffic from the outside is blocked! To connect to your instance, whether through ssh, ping (icmp), RDP or something else; your instance firewall must be configured to let it pass. If you are sure you have the addressing right (using public addresses for the instance and have everything set up properly on the local side), then it may be an idea to have a look at the firewall - or Security groups, as it is called.
Note
In the context of security rules, the Remote address is seen from the view point of the instance, not your location. When you add rules, make sure the Remote address entered is the address(es) of the system you are coming from. If you are going through a jumphost, then it is the address of the latter which should be entered.
Solution: Make sure the rules in your security group are appropriate. If unsure if it is the remote address in the rules which blocks you, a temporary fix is to use 0.0.0.0/0 (for IPv4) or ::0/0 (for IPv6) to open up the specific protocol for the whole Internet. But please make sure to tighten this up when your debugging session is over!
Lost access to instance
There can be multiple reasons for losing access to an instance.
Lost SSH key
Disk trouble e.g. wrong mount path (Rescue instance)
Problems with NIC/network (Rescue instance)
Failed resize operation
The first to check is the current state of the instance, as well as which types of cloud and recovery options that the guest OS may support:
The console view on the dashboard may give some hints about the current state of the instance. You can get a direct URL to this VNC console from the CLI command
openstack console url show <server name or id>or by clicking the link “Click here to show only console” visible above the console in the dashboard. You can also print additional console logs fromopenstack console log show <server name or id>. If you have set the password for the cloud user or any other user (including root, not default), you can login here. This may be sufficient to fix SSH access by temporarily enabling password-based login for instance.If the instance runs successfully (e.g., shows a normal login prompt in the console, replies to SSH and/or ping, and does the tasks it was originally set up to do), there is a high chance that you can regain access to the instance by using built-in Openstack functions, such as rebuild, snapshot and rescue.
If the instance has problems booting (e.g., hangs on console, or doesn’t show any login prompt or boots into rescue mode), then it may be necessary to regain access using more generic boot loader tricks. The guest OS may come with a boot loader that can be modified to gain root access to the instance. For the GOLD Linux images, this involves temporarily editing the GRUB boot loader.
Below is a table summarizing various methods for re-gaining access (a question mark indicates not fully tested):
Method |
Solves access |
OS |
State when lost |
Difficulty |
Preserves data |
Notes |
|---|---|---|---|---|---|---|
snapshot + rebuild with new key |
SSH |
Any |
Login |
Easy |
Yes (snapshot) |
Replaces server, preserves IP (only CLI) |
set –password |
Console |
Any (cloud) |
Login |
Easy |
Yes |
Sets root password; requires cloud-init support |
rescue with password |
Console |
? |
Pre-login |
Easy |
Yes (volume) |
Rescue image with cloud-init password injection support |
rebuild with user data |
Console |
? |
Login |
Intermediate| Yes (snapshot) |
Requires cloud-init support |
|
snapshot + create |
SSH |
Any |
Working snapshot |
Easy |
Yes (snapshot) |
Creates new server and IP from existing snapshot |
single user mode (root) |
Console |
Linux |
Pre-login |
Hard |
Yes |
Boot key stroke may vary; requires unset root password |
recovery mode (root) |
Console |
Linux |
Pre-login |
Hard |
Yes |
Boot key stroke may vary; requires unset root password |
read/write bash shell (root) |
Console |
Linux |
Pre-login |
Hard |
Yes |
Boot key stroke may vary |
The linux GOLD images come by default without a password set (password unset) for the cloud and root user. Because of this, it is not possible to login to the console. Similarly, SSH login with the root user is disabled.
How to get into the GRUB boot menu:
At the time of testing (2025-07-11), with the image GOLD Ubuntu 24.04 LTS, you first get into the QEMU UEFI/BIOS boot menu. From there you can get into the GRUB menu. For both steps you need to press Escape at the right time:
First, in console view, press the “Send CtrlAltDelete” button to force a reboot. Then start hitting the Escape key repeatedly (just after restarting the instance and seeing that the text is unavailable in the console window, but before and just on time on the Tiano screen, and not any longer). Then you should be able to access the QEMU UEFI/BIOS menu, which should be the same independently of guest OS. There might be additional tricks to do here for regaining access, such as entering the EFI boot shell or other entries that are available from the boot menu. To continue to the GRUB menu, select continue. Then very shortly after, hit the Escape key one time. This should get you into the GRUB menu. From here you can do any of the three last methods in the above table. Edits here are temporary / do not persist across reboots. Note that if you don’t have an English keyboard, you will probably have a hard time finding the keys consisting of = and /, etc. For some tips regarding the Norwegian keyboard, see the relevant section below:
Single User Mode
When having selected the OS (Ubuntu in this case), press the letter e. Add at the end of the line starting with linux, the word single (with a space `` `` before that). Press ctrl + x to continue booting. When asked to press ctrl + D to get into maintenance, do that. This gets you into a shell with root privileges. From here you can set password for any user: Set root password: passwd. Set ubuntu password: passwd ubuntu, and so on. Then reboot.
On Centos and possibly other RHEL derivatives like Alma Linux, you have to remove all console=ttys besides the tty0 and add rd.break enforcing=0 at the end of the line starting with linux16. There exist several examples and documentation on the general web, for how to start your Linux server/instance in single mode (root access). For these distros there are possibly additional steps you need to follow to be able to set passwords: You need to mount /sysroot by running mount -o remount,rw /sysroot and then change root by running chroot /sysroot. Now you can run e.g. passwd
Recovery mode
Select “Advanced options for Ubuntu”, or the related entry for your choosen linux guest OS, and press Enter. From there, select the entry with recovery mode in it that has the highest version number (latest kernel version), then press Enter. This should get you into a Recovery menu. Select the root entry (“Drop to root shell prompt”), press Enter. This should get you into a shell with root privileges. Proceed setting passwords and reboot like in the previous method.
Note that setting the root password again using the single user and recovery methods, will ask you to first enter the previous root password. If you have forgot the existing root password, there is at least one more method to try that will bypass needing to write the existing root password:
Read/Write bash shell
When having selected the OS (Ubuntu in this case), press the letter e. Now, the method is to look for the place in the line starting with linux that has the word ro (read-only). Then replace ro with rw init=/bin/bash and delete all letters trailing/followed after this replacement. For the Ubuntu image in the example, the stuff that was removed were different tty parameters. Then press ctrl + x to continue booting. This should get you into a shell with root privileges. Proceed setting passwords and reboot like in the two previous methods.
Note on non-US keyboard in GRUB:
The keyboard layout is probably en_US.UTF8 which means you have to figure out what keys on your keyboard represent =, /, - and : etc.
On my keyboard (Norwegian):
= is \ left key from backspace
/ is - left key from right shift
- is ? second left key from backspace
: is shift + ø
Great, now I have console access. How can I now get SSH access with my new key?
You need to change the file ~/.ssh/authorized_keys for the affected users. You can fetch your public SSH keys from GitHub like this:
E.g
wget https://github.com/username.keys
or
curl -o pub.keys https://github.com/username.keys
Then add or replace the keys in ~/.ssh/authorized_keys
E.g
cat username.keys >> ~/.ssh/authorized_keys
~/ means that the authorized_keys file is located in for instance /home/username/.ssh/authorized_keys
After updating this file with your new public key(s), you should be able to login using SSH with the new key(s).
Note
If you are experiencing problem with booting up and you have attached volumes(s), try dettach them first then run rescue agian.
Rescue instance
Here is a quick runddown on how it is done using the dashboard.
For more information, take a look at the Openstack documentation on rescue mode
Note
Setting a password when activating rescue mode dose not work. If you lost access to the SSH key take a look at lostaccess
Using the dashboard
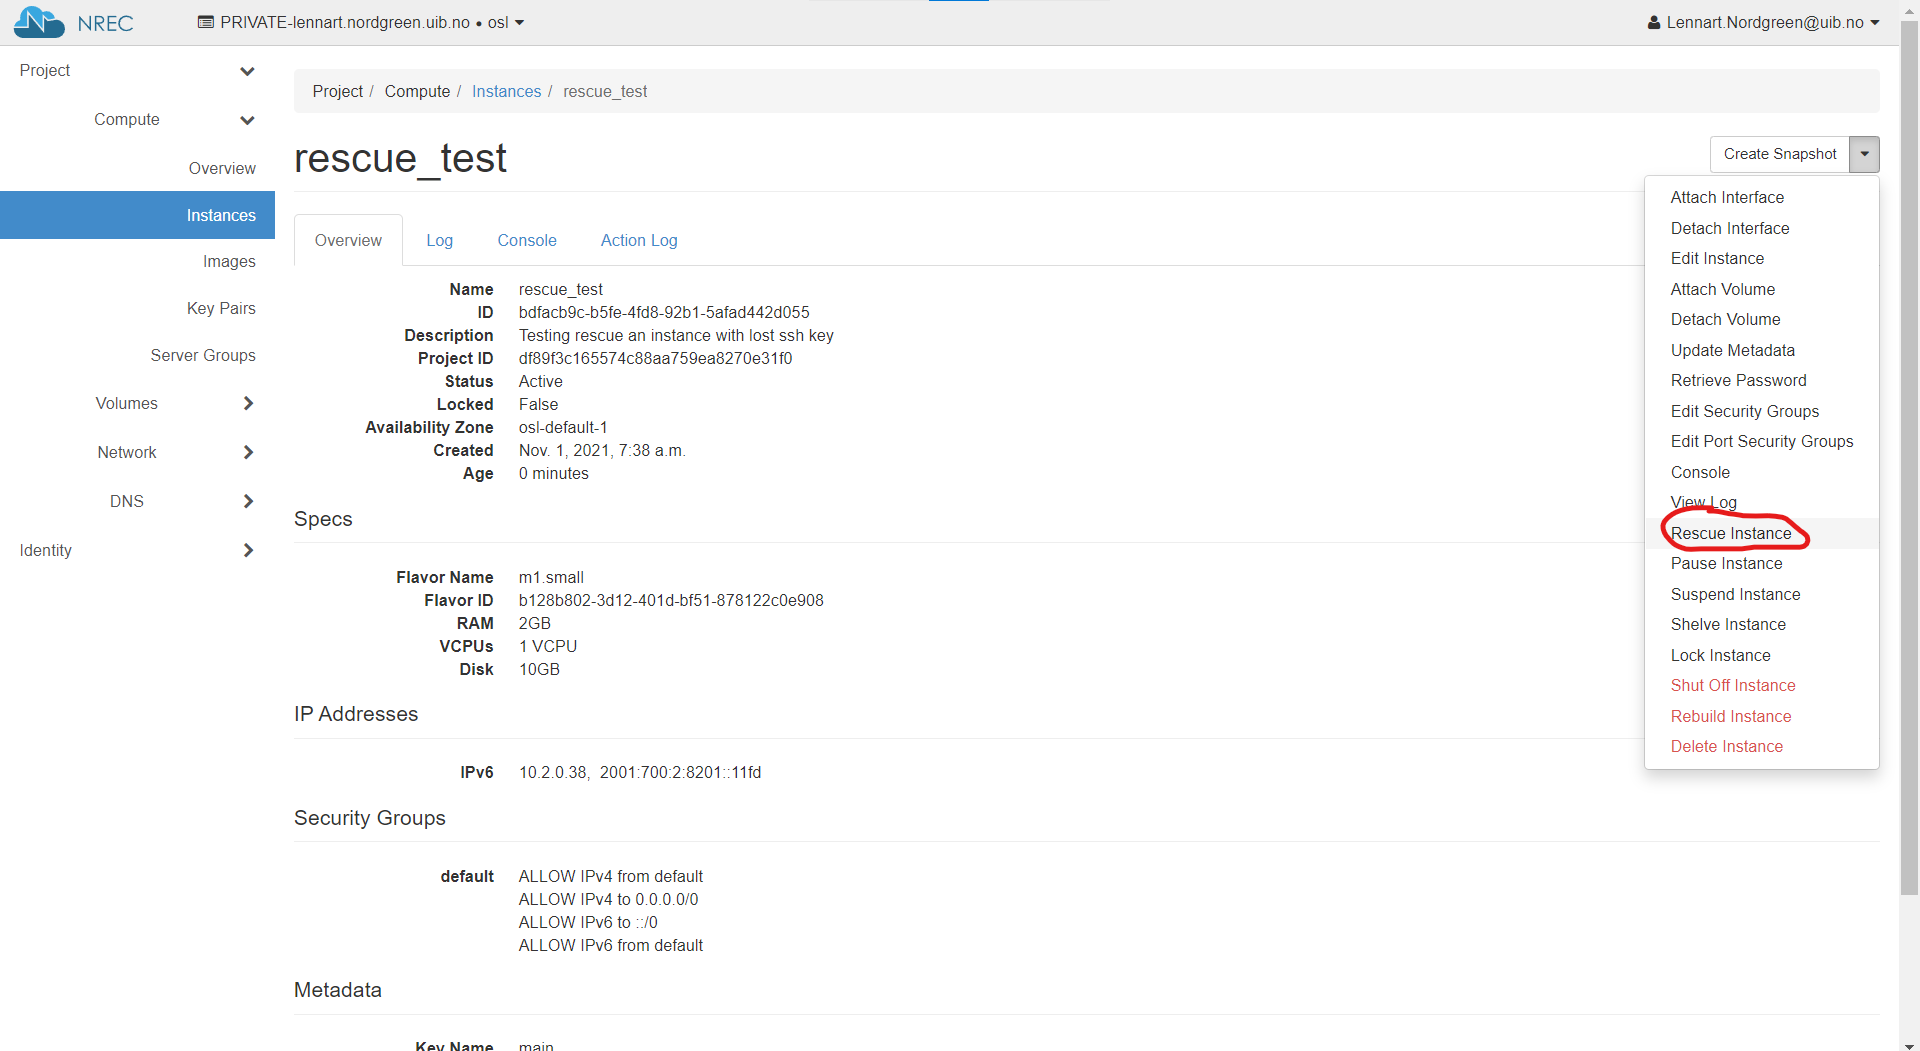
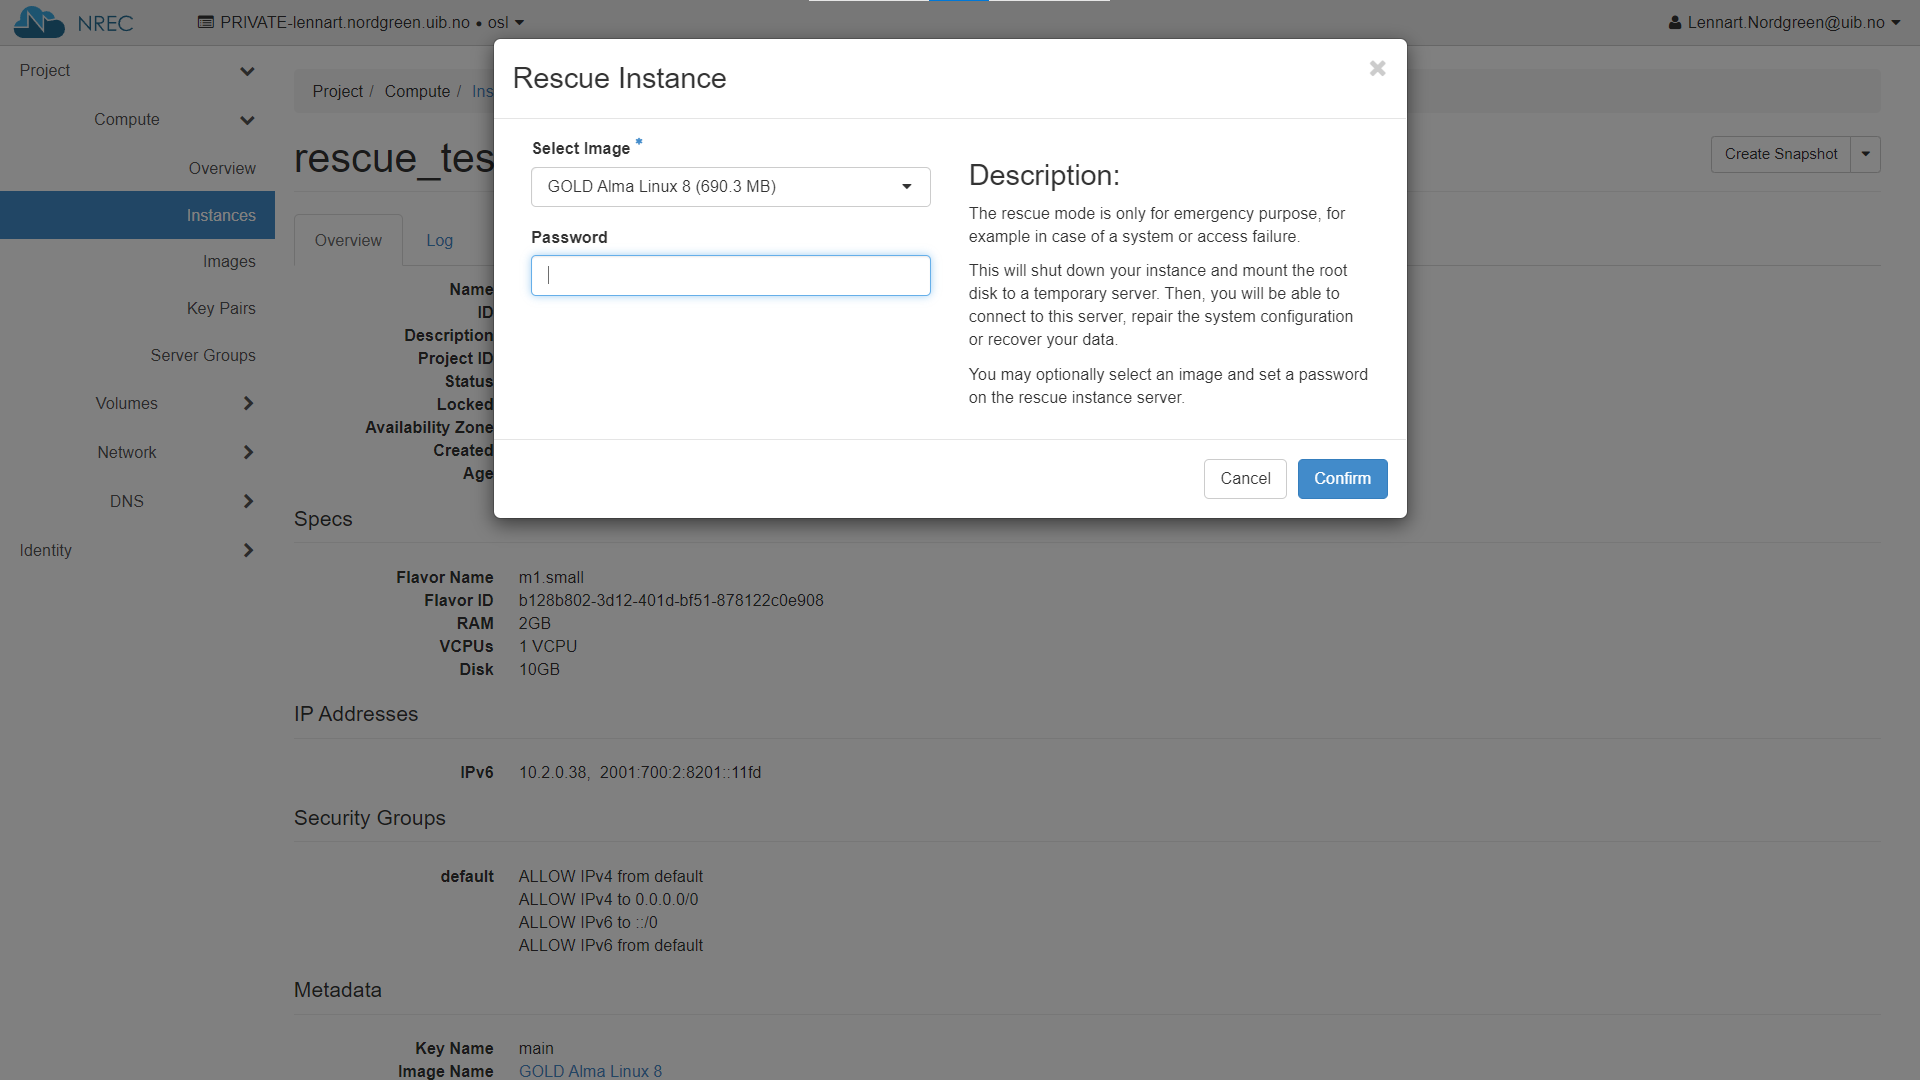
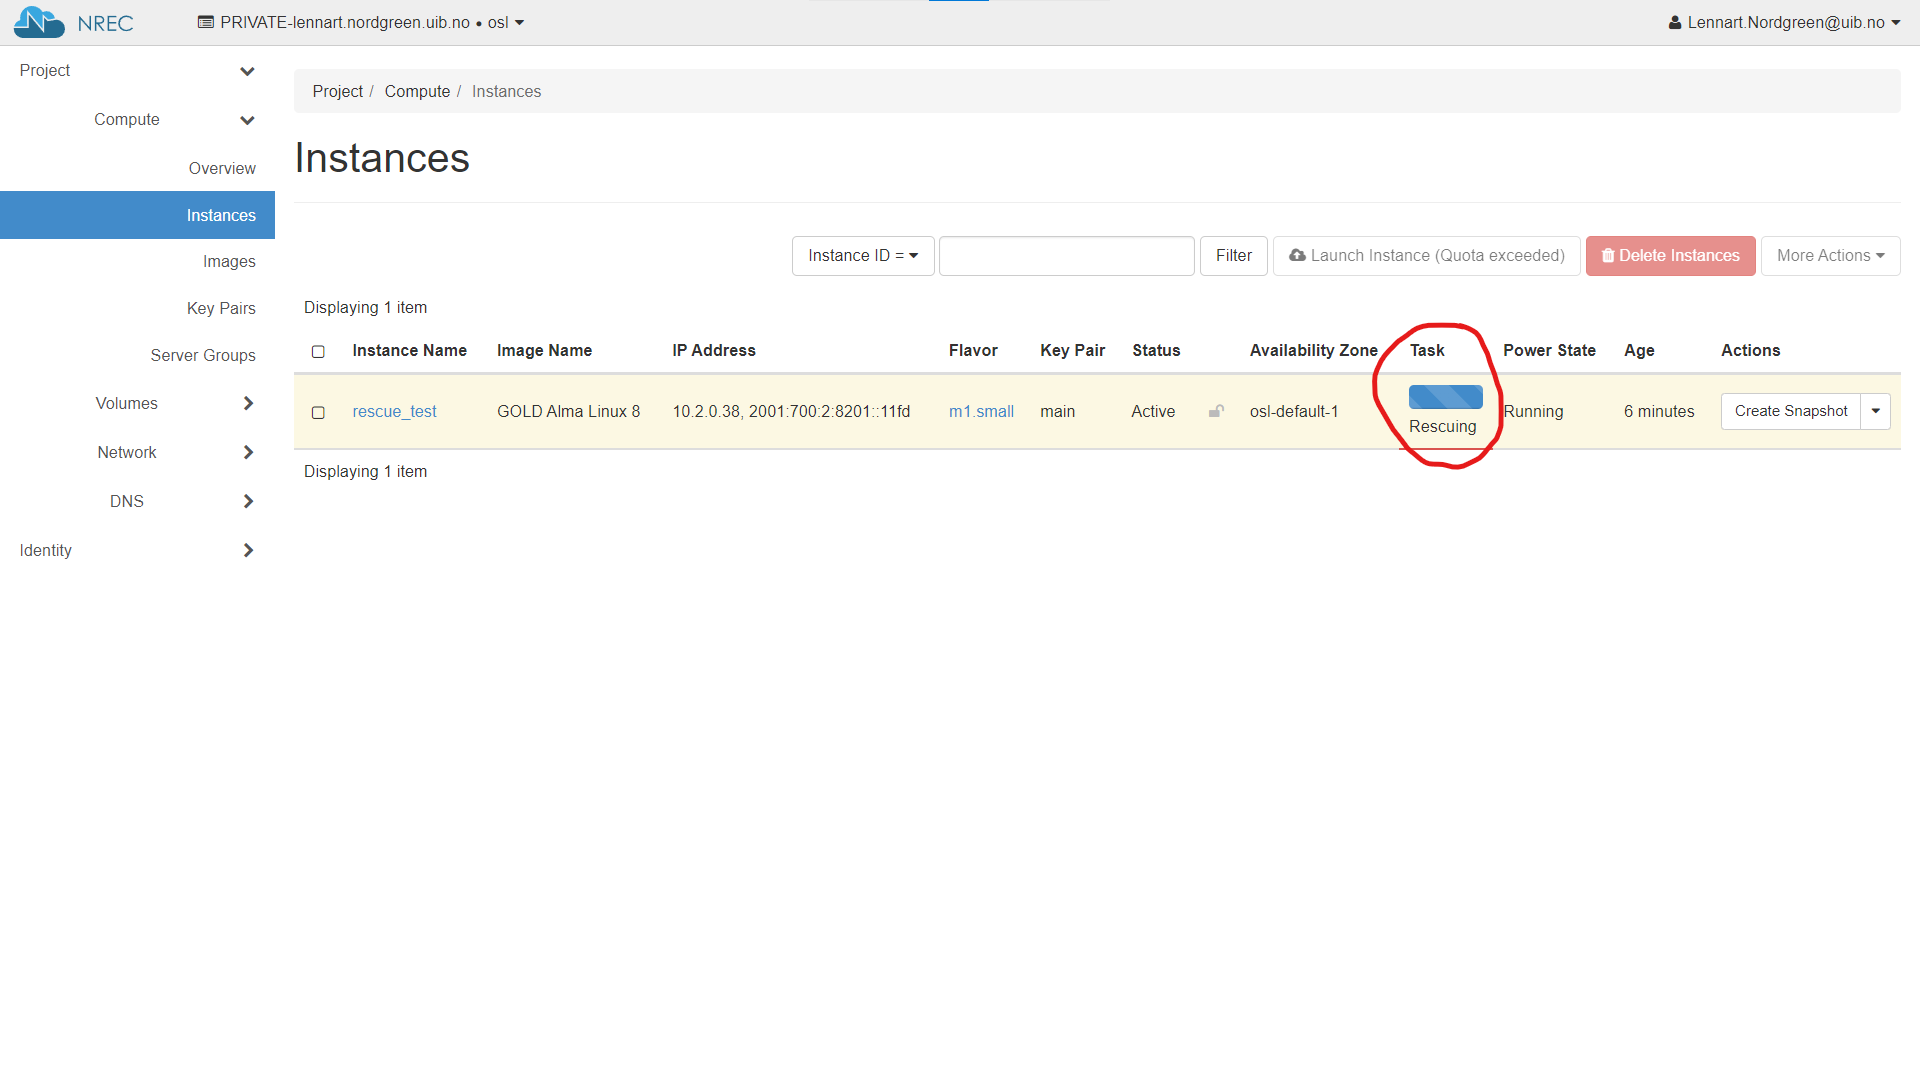
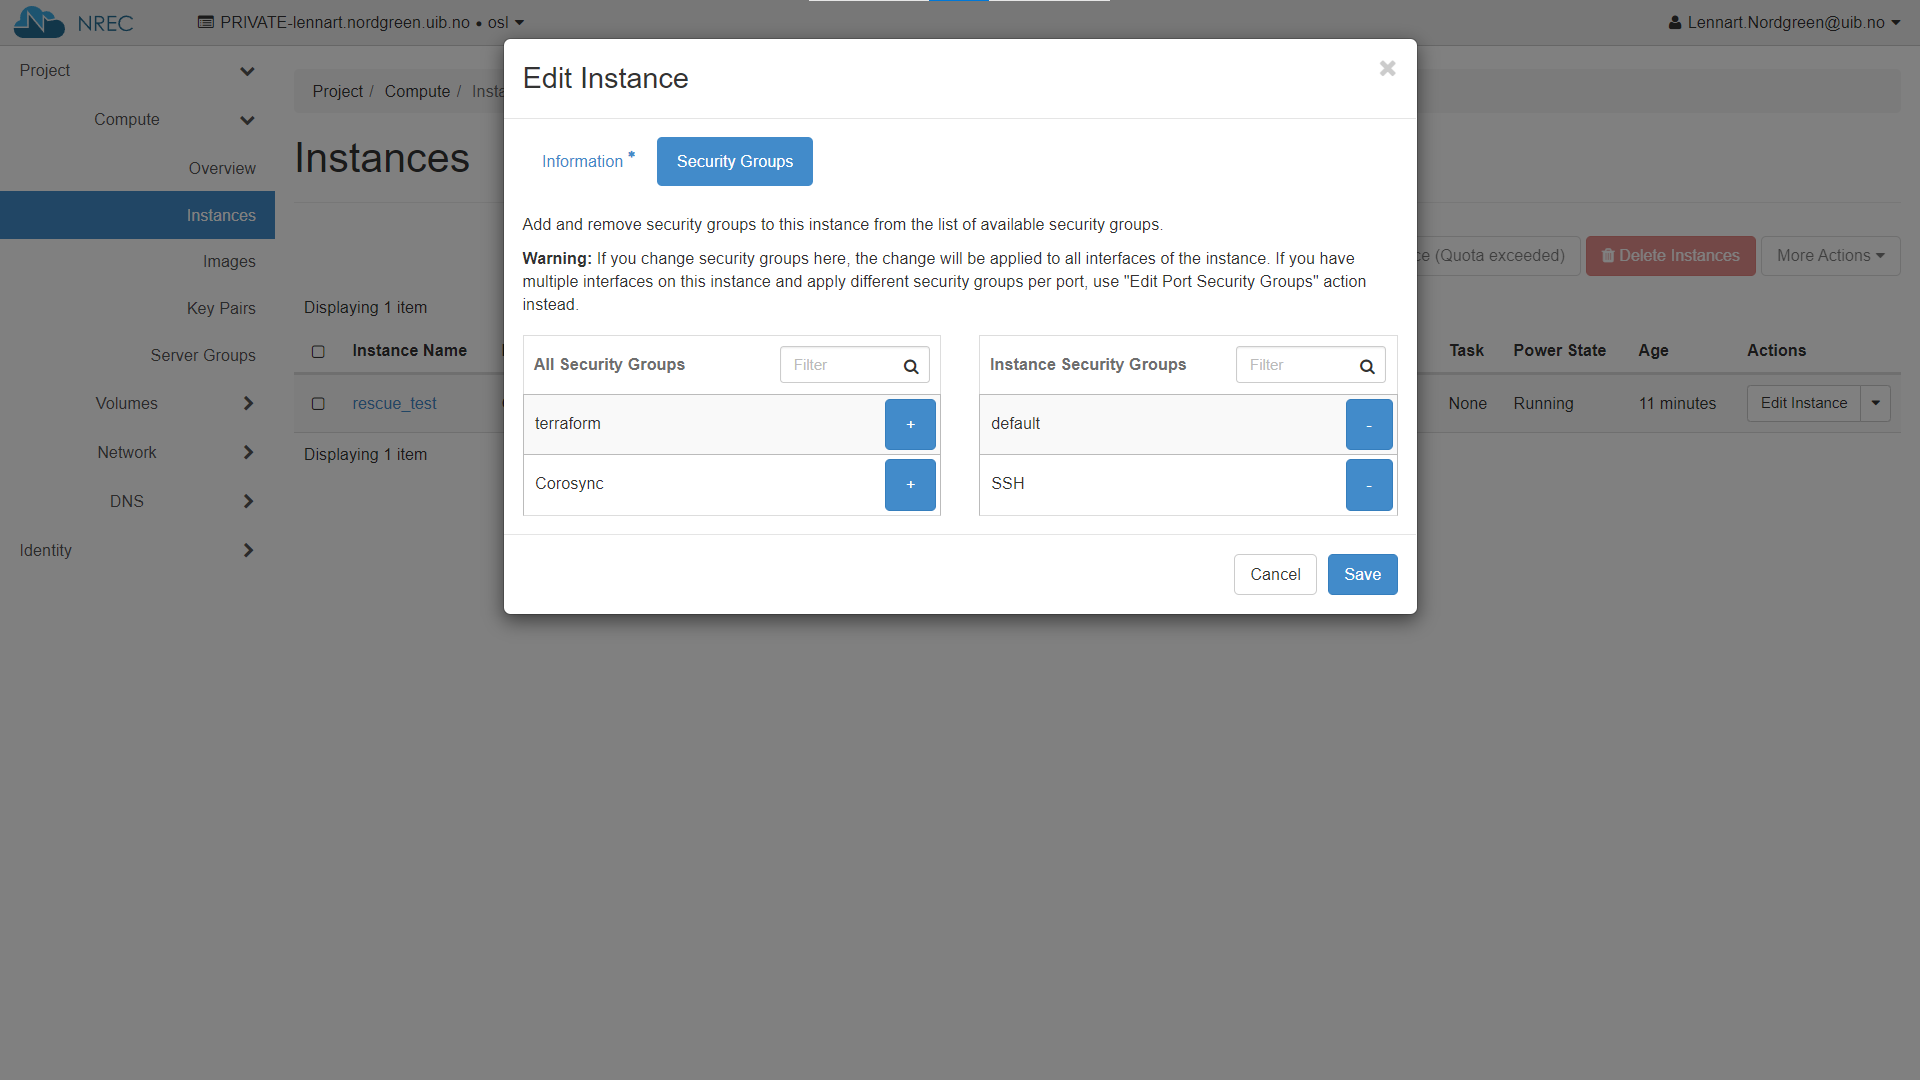
If you need to edit security groups then edit instance and then select “Security Groups”.
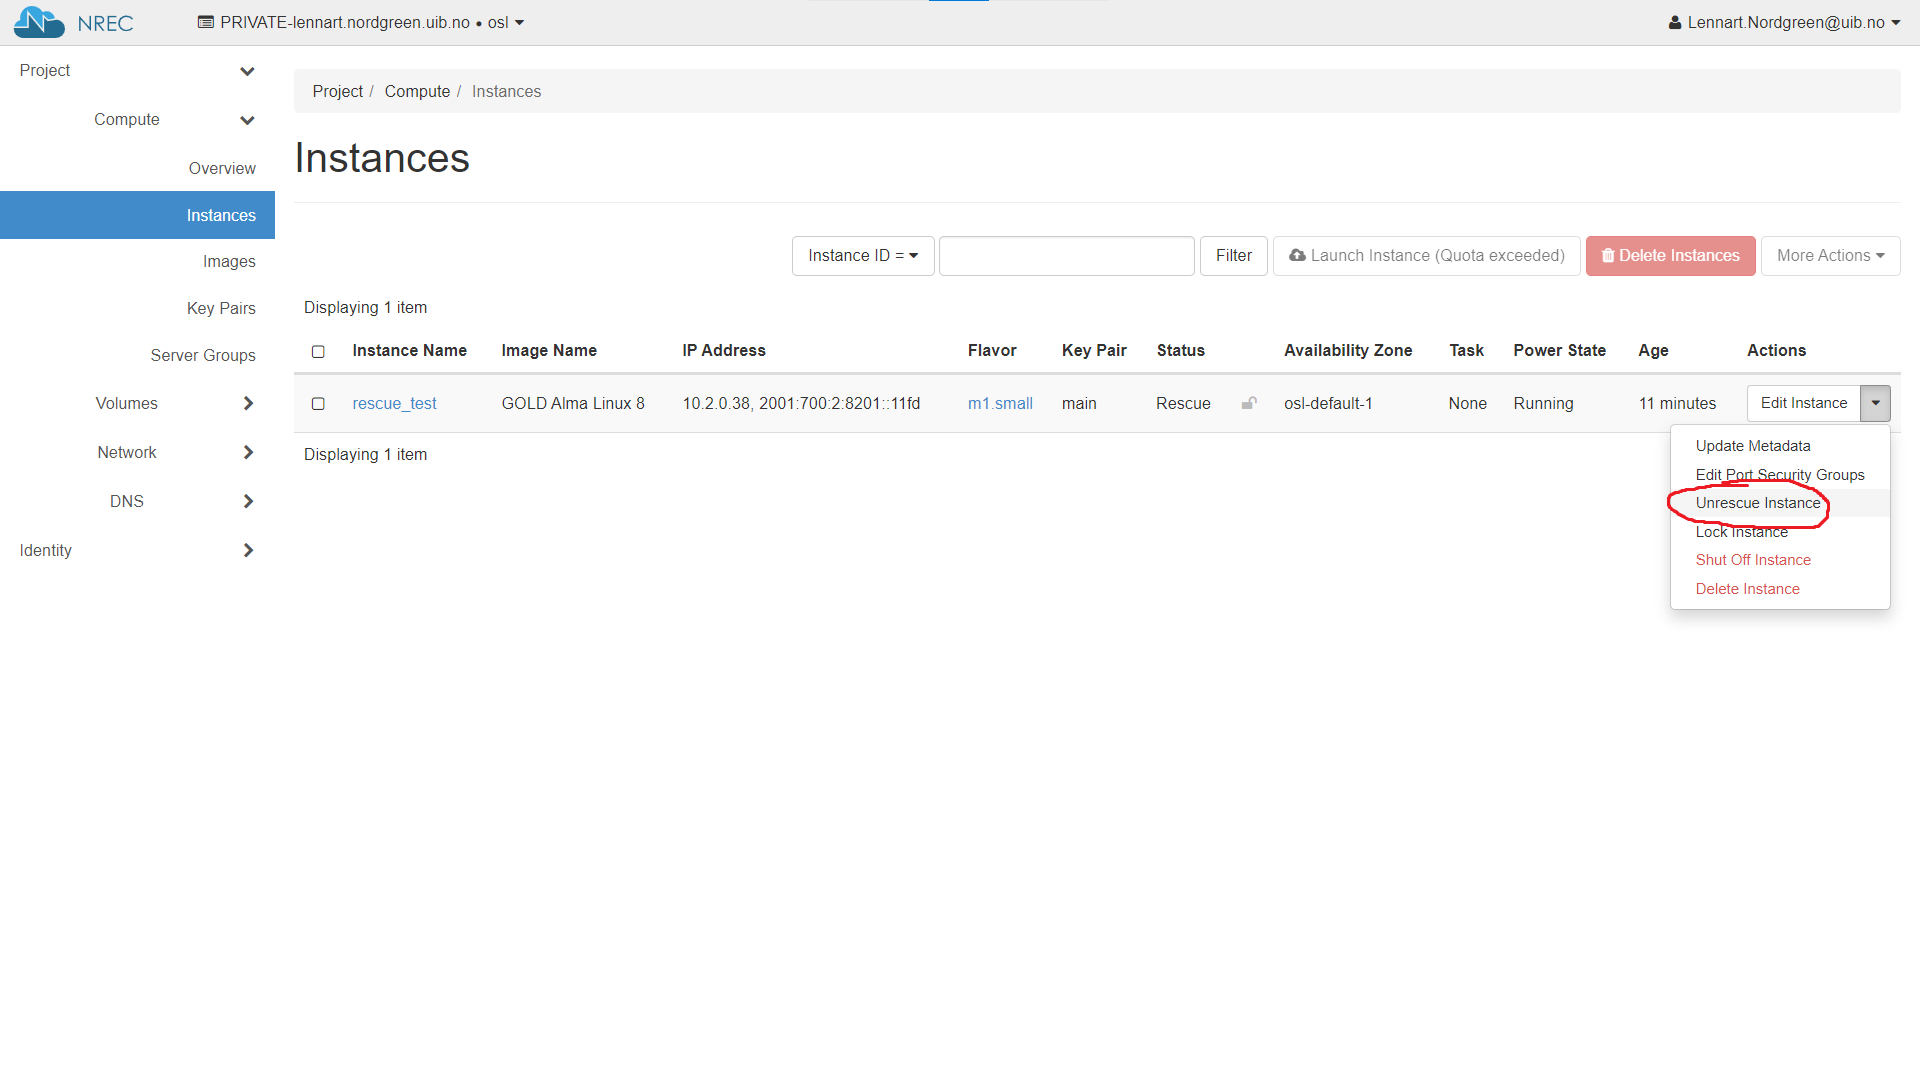
To SSH to the rescued instance, you may need to delete the key-fingerprint to the original instance
ssh-keygen -f ~/.ssh/known_hosts -R <INSTANCE-IP>’
You should then be able to SSH into the rescued instance using the default username, as listed in https://docs.nrec.no/gold-images.html#id18
Note
(Linux) Volume UUID with different images
If you do not select the same GOLD image as the one the instance originally used, the two (pseudo)disks may end up with the same UUID. For some distributions this may cause the instance to mount its root filesystem from the damaged disk. The upshot is that any SSH connections will seemingly connect to the broken instance, and the rescue attempt is thus moot.
The workaround is to explicitly specify an image for the rescue attempt, and select any other image than the one used for setting up the instance in the first place.
Not able to SSH to Debian instance created from uploaded snapshot image
Description
I created an instance based on a Debian image that I downloaded before. The image was created from a snapshot of a Debian instance. I am not able to SSH to the new instance.
Possible solution
When an image snapshot is downloaded from a project;
openstack image save --file <image name>.img <image ID>
it does not save its properties from OpenStack.
These image properties can be seen using the OpenStack API. They are only set for pre-existing images and snapshots in a project:
openstack image show <image ID> -c properties -f yaml
Unfortunately, when a new instance is created based on the .img file, these properties are not set. For Debian instances, lack of these properties imposes hardware change that leads to a different naming of the network interface card (NIC). Since the old NIC name is specified in existing network configuration files, the newly created instance will not receive a network connection.
The solution is to set the correct properties of the uploaded image. The properties that need to be set in order for the image to perform optimally can be found in our image repository [1]. Look for the gold image that best matches your image, and set each property with the following command:
openstack image set --property <name>=<value> <image ID>
Example:
openstack image set --property hw_machine_type=q35 <image ID>
Specifically, for a Debian 12 instance, the properties that
needs to be set are specified in our image repository [1] under
‘debian12’::’properties’ and is a subset of the properties seen with
the openstack image show command above.
$ while read line; do k=$(echo $line | cut -d ' ' -f 1); v=$(echo $line | cut -d ' ' -f 2); cmd="openstack image set --property $k=$v <image ID>"; eval $cmd; done <<< 'hw_disk_bus scsi
     hw_scsi_model virtio-scsi
     hw_rng_model virtio
     hw_qemu_guest_agent yes
     hw_machine_type q35
     hw_firmware_type uefi
     hw_vif_multiqueue_enabled yes
     os_require_quiesce yes
     os_type linux'
Footnotes