Using SSH
Last changed: 2026-06-09
Virtual machines in NREC are accessed using SSH key pairs. There are numerous ways to achieve this, depending on the OS on your local computer. The preferred method is to create an SSH key pair on your local computer (or use an already existing one), and upload the public key into NREC.
In order to access an instance in NREC, you need to specify the correct ssh public key when creating the instance:
Create an SSH key pair (or use an existing one)
Upload the public key to NREC and give it a proper name
Specify this key by its name when creating the instance
Connect via SSH to the instance using the corresponding private key
We will go through these steps in more detail.
Creating a key pair
There are two methods for creating an ssh key pair in NREC. To create an ssh key pair you should EITHER
Importing an existing public key (recommended): With this method you upload an existing public key into NREC. This is the recommended approach
OR
Letting OpenStack create a key pair: Here, NREC will create a new key pair and let you download the private key into a file
Most users should choose to create an ssh key pair on their client machine, and upload the public key to NREC.
Importing an existing public key (recommended)
This is the recommended approach!
If the local computer is Linux, any BSD variant such as FreeBSD, MacOS
or Windows, the easiest way is to create a key pair locally if you
don’t already have one, using the command ssh-keygen (on Windows
it’s called ssh-keygen.exe):
$ cd ~
$ ssh-keygen -C "NREC keypair 2024-04-05" -a 100 -t ed25519 -f .ssh/id_ed25519_nrec
Generating public/private ed25519 key pair.
Enter passphrase (empty for no passphrase):
Enter same passphrase again:
Your identification has been saved in .ssh/id_ed25519_nrec
Your public key has been saved in .ssh/id_ed25519_nrec.pub
The key fingerprint is:
SHA256:bB/SoBMwTIXgWzgCfnRXy1i22rcgw5sZm49ouqwTuE0 NREC keypair 2024-04-05
The key's randomart image is:
+--[ED25519 256]--+
|. .=++...+       |
|o...+o. = o      |
|..+.. ...+       |
| ..+  .+oo       |
|. .   o*Soo.     |
|..E    oXoo..    |
| +.    *  ..     |
|..o  .. o        |
| .o++. . .       |
+----[SHA256]-----+
Before running ssh-keygen we’re making sure that the current working directory is our home directory. In this case we are creating a key pair of type ed25519, which it recommended. We specify the output filename .ssh/id_ed25519_nrec. The files created in your home directory are
- .ssh/id_ed25519_nrec
This is the private key. It should be kept safe.
- .ssh/id_ed25519_nrec.pub
This is the public key. It can be used to authenticate holders of the private key.
To import your existing public key into NREC, navigate to Project -> Compute -> Key Pairs:
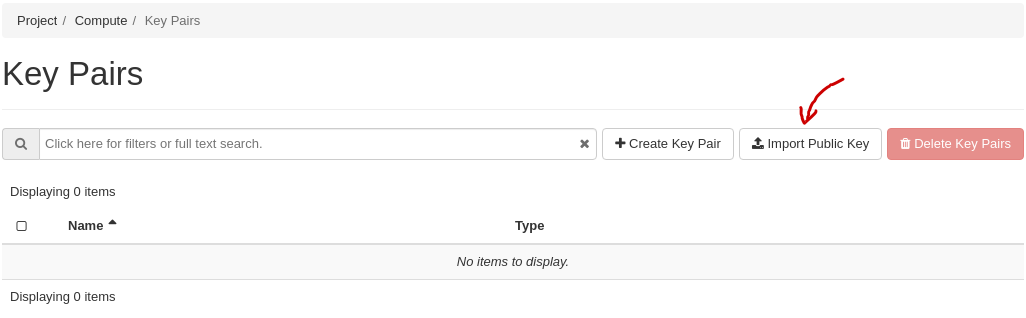
Click on Import Key Pair. In the dialog that appears, fill out the following:
Key Pair Name: Give the key pair a proper name, so you remember what it is and where it can be accessed from (here: “homeoffice”)
Key Type: Choose “SSH Key” from the drop-down menu
Either use Choose File and find the .ssh/id_ed25519_nrec.pub file, or cut & paste the contents of .ssh/id_ed25519_nrec.pub into the “Public Key” field
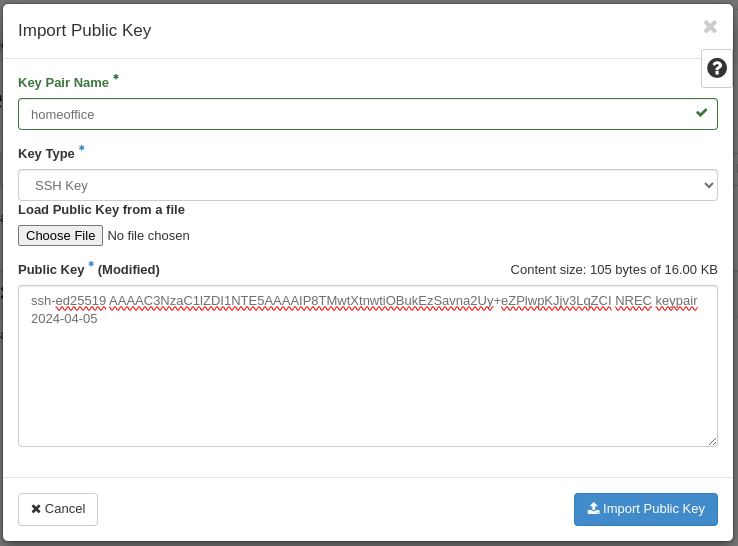
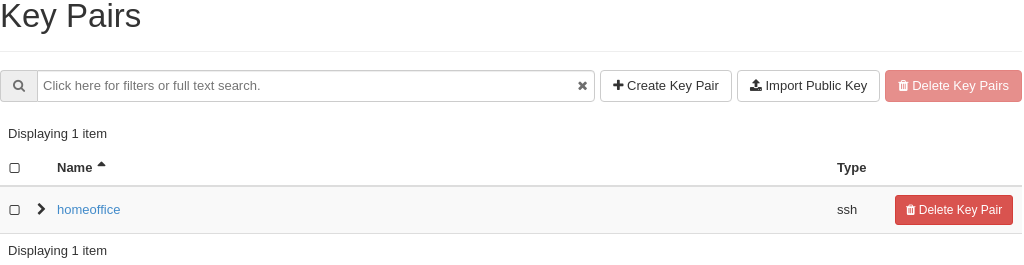
Click “Import Key Pair” and the key is saved:
Uploading an existing public key via CLI is done with this command:
openstack keypair create --public-key <file> <name>
Example:
$ openstack keypair create --public-key ~/.ssh/id_ed25519_nrec.pub homeoffice
+-------------+-------------------------------------------------+
| Field       | Value                                           |
+-------------+-------------------------------------------------+
| fingerprint | e2:2e:26:7f:5d:98:9e:8f:5e:fd:c7:d5:d0:6b:44:e7 |
| name        | homeoffice                                      |
| user_id     | 6bb8dacdc9b94fff89258094bc56a49f                |
+-------------+-------------------------------------------------+
You can then list your keys:
$ openstack keypair list
+----------+-------------------------------------------------+
| Name     | Fingerprint                                     |
+----------+-------------------------------------------------+
|homeoffice| e2:2e:26:7f:5d:98:9e:8f:5e:fd:c7:d5:d0:6b:44:e7 |
+----------+-------------------------------------------------+
Letting OpenStack create a key pair
You can let OpenStack create a key pair for you, if you don’t wish to create one locally or use an existing one. Navigate to Project -> Compute -> Key Pairs:
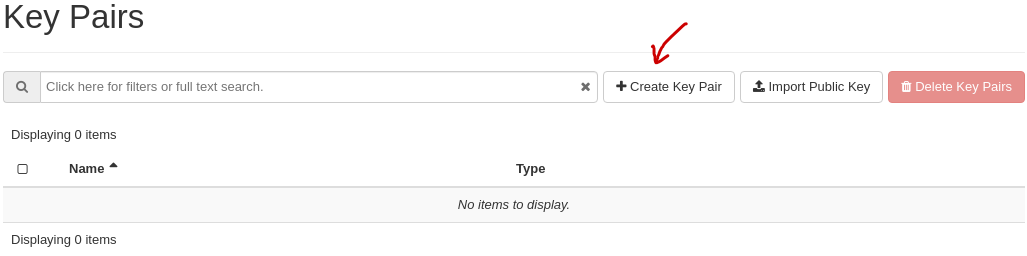
Click on Create Key Pair:
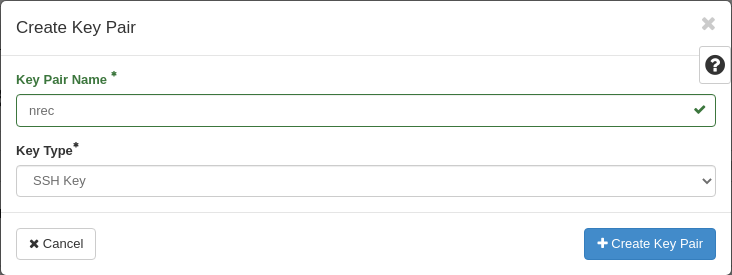
Choose a name for you key pair (here: “nrec”), select “SSH Key” from the Key Type drop-down menu, and click Create Key Pair. The newly created private key will be downloaded by the browser automatically as <name>.pem (here: “nrec.pem”).
The name of the downloaded file is based on the name you provided earlier. In this example the file is called “nrec.pem” as “nrec” was provided as the key pair name. Remember to restrict the access to the private key, as SSH will refuse to use unless it’s properly protected:
$ chmod 0600 nrec.pem
Using the CLI, you can have Openstack create a new key pair for you using this command:
openstack keypair create --private-key <file> <name>
Where <file> is the name of the file in which the private key will be saved. If this option is omitted the contents of the private key will be printed on the console.
Example:
$ openstack keypair create --private-key nrec.pem nrec
+-------------+-------------------------------------------------+
| Field       | Value                                           |
+-------------+-------------------------------------------------+
| fingerprint | 9d:b5:68:c9:d4:53:ab:73:95:f7:85:a2:74:a8:41:9e |
| name        | nrec                                            |
| user_id     | 6bb8dbcdc9b94fffa9258094bc56a49f                |
+-------------+-------------------------------------------------+
You can then list your keys:
$ openstack keypair list
+-------+-------------------------------------------------+
| Name  | Fingerprint                                     |
+-------+-------------------------------------------------+
| nrec  | 9d:b5:68:c9:d4:53:ab:73:95:f7:85:a2:74:a8:41:9e |
+-------+-------------------------------------------------+
Remember to restrict the access to the private key, as SSH will refuse to use unless it’s properly protected:
$ chmod 0600 nrec.pem
Connecting to the instance
Important
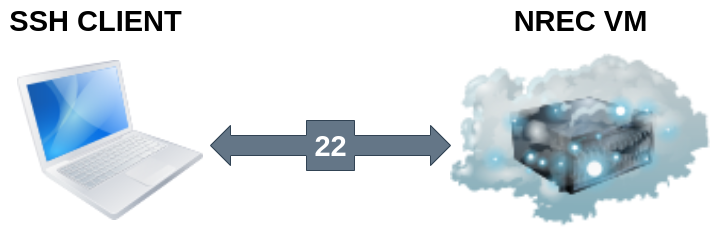
Connecting to the instance requires that port 22 (the SSH port) is allowed through the firewall. For more information, see Working with Security Groups
After creating an instance you will use the ssh key pair to connect to it. During the instance creation, NREC has added the public key into the ~/.ssh/authorized_keys for the proper user. The default user name varies with the Linux distribution at the discretion of the vendor. The most common are:
Image |
Default user name |
|---|---|
CentOS Stream |
|
Rocky Linux |
|
Alma Linux |
|
Fedora |
|
Ubuntu |
|
Debian |
|
RHEL |
|
Windows Server |
|
This is a non-exhaustive list. For all gold images, see NREC GOLD images. For images not listed here, consult the image vendor’s documentation.
To connect via ssh, we specify the private key file, the username and the IP address of the instance:
$ ssh -i <keyfile> <username>@<ip-address>
If the keyfile is the default, created using ssh-keygen and using the default filename, you can omit the -i <keyfile> option. Example for a CentOS instance, using a key called “nrec” created with ssh-keygen:
$ ssh -i ~/.ssh/id_ed25519_nrec centos@2001:700:2:8201::13d0
In order to use the downloaded private key, you must specify the private key file, like this (example for “nrec.pem” above):
$ ssh -i nrec.pem <username>@<ip-address>
After successfully connecting to the instance. You can then use sudo to gain root access:
[centos@testvm ~]$ sudo -i
[root@testvm ~]# whoami
root
Connecting through a proxy
In this paragraph we will show how to
Use a jump host (also known as bastion host) as an IPv4-to-IPv6 proxy, and as a general access point that is particularly useful when on mobile devices such as laptops
How to set up SSH multiplexing when using a jump proxy, for a better workflow when connecting to NREC instances
Using security groups, you should attempt to limit the access to the instance as much as possible. This also applies to SSH access. We encourage the use of login hosts such as login.uio.no and login.uib.no to access your instances in NREC.
We also encourage users to choose the «IPv6» network rather than «dualStack», if possible. With the «IPv6» network you need to connect to your instance from a host that has IPv6 (such as the login hosts mentioned above).
Working with your instance from a login host, rather than your personal computer, can sometimes be cumbersome and make a less efficient workflow. It is possible to use a “jump host”, such as login.uio.no and login.uib.no, as proxy when connecting to the instance:
ssh -J <username>@<proxyhost> <image-username>@<nrec-instance>
Example, if we were to connect to an Ubuntu instance using its IPv6 address via login.uio.no:
$ ssh -J uiouser@login.uio.no ubuntu@2001:700:2:8301::1265
uiouser@login.uio.no's password:
You don’t need IPv6 on the client host for this to work! We’re using login.uio.no as an IPv4-to-IPv6 proxy.
There is a way to avoid having to specify -J <username>@<proxy>
every time. For this we need to create an ssh config file:
$ touch ~/.ssh/config
$ chmod 0600 ~/.ssh/config
The commands above creates an empty file with the correct permissions. You can edit this file and add:
Host 2001:700:2:8200:* 2001:700:2:8201:* 2001:700:2:8301:* 2001:700:2:8300:*
    ProxyJump <username>@<proxy>
Replace <proxy> with the name or IP of the proxy host, and
<username> with your username at the proxy host. This configures
ssh to use the proxy with all IPv6 addresses in NREC. With this config
in place, you don’t need to specify the jump proxy on the command
line:
$ ssh ubuntu@2001:700:2:8301::1265
uiouser@login.uio.no's password:
ubuntu@2001:700:2:8301::1265: Permission denied (publickey).
But what about the SSH key? You still need to provide the ssh key if it’s not the default, as the example above shows. You may give the key on command line as described above, or you can specify the key in the config:
Host 2001:700:2:8200:* 2001:700:2:8201:* 2001:700:2:8301:* 2001:700:2:8300:*
    ProxyJump uiouser@login.uio.no
    IdentityFile ~/.ssh/id_ed25519_nrec
Then it works. But we can enhance the experience even further by using
session multiplexing. We first add a directory under ~/.ssh, which
will hold our multiplexing sockets:
$ mkdir -m 0700 ~/.ssh/controlmasters
Then we add the following config for login.uio.no:
Host login.uio.no
    User uiouser
    ControlPath ~/.ssh/controlmasters/%r@%h:%p
    ControlMaster auto
    ControlPersist 10m
With this multiplexing config in place, we will have to authenticate to login.uio.no the first time, while any subsequent connections will use the same channel to the proxy host and not require authentication. It will also be much faster. Other SSH commands, such as scp, will also use this multiplexed session.
Our final ~/.ssh/config:
Host 2001:700:2:8200:* 2001:700:2:8201:* 2001:700:2:8301:* 2001:700:2:8300:*
    ProxyJump uiouser@login.uio.no
    IdentityFile ~/.ssh/id_ed25519_nrec

Host login.uio.no
    User uiouser
    ControlPath ~/.ssh/controlmasters/%r@%h:%p
    ControlMaster auto
    ControlPersist 10m
Obviously, you should replace the username, proxy hostname and identity file to work in your environment.
Transferring data
At some point you may want to transfer data to or from your instance, and SSH is a good tool for that as well. You can still use proxy host (manually or via configuration) as described above. For ease and simplicity we’ll divide into to different scenarios: Transferring a single file, and transferring a directory recursively.
Transferring single file via SCP
When using SCP to transfer a file, use the syntax below. We provide examples with and without advanced options.
From instance to local machine:
scp <username>@<ip-address>:<file> <target-directory>
Examples:
Simple example with IPv4:
$ scp ubuntu@258.37.63.217:/data/results.dat ~/thesis/
Simple example with IPv6 (notice brackets
[]around IP address):$ scp ubuntu@[3001:700:2:8200::268f]:/data/results.dat ~/thesis/
In some shells (zsh) you may need to escape the brackets, i.e.
[→\[, or put the whole argument in quotes.Advanced example using proxy host and specifying key, with IPv6:
$ scp -i ~/.ssh/id_ed25519_nrec -J uiouser@login.uio.no ubuntu@[3001:700:2:8200::268f]:/data/results.dat ~/thesis/
From local machine to instance:
scp <file> <username>@<ip-address>:<target-directory>
Examples:
Simple example with IPv4:
$ scp ~/thesis/analysis.dat ubuntu@258.37.63.217:/data/
Simple example with IPv6 (notice brackets
[]around IP address):$ scp ~/thesis/analysis.dat ubuntu@[3001:700:2:8200::268f]:/data/
In some shells (zsh) you may need to escape the brackets, i.e.
[→\[, or put the whole argument in quotes.Advanced example using proxy host and specifying key, with IPv6:
$ scp -i ~/.ssh/id_ed25519_nrec -J uiouser@login.uio.no ~/thesis/analysis.dat ubuntu@[3001:700:2:8200::268f]:/data/
Transferring single file via SFTP
With SFTP you can access the instance remotely and it behaves like an FTP server. You can for the most part use familiar FTP commands. Unlike with SCP, we connect to the server and have an open session which we can use to transfer files to and from the local machine, until we close the session. To open a session:
sftp <username>@<ip-address>
This will open an SFTP session starting at the home directory of the user. You can also specify a directory:
sftp <username>@<ip-address>:<directory>
Examples:
Simple example with IPv4:
$ sftp ubuntu@258.37.63.217
Simple example with IPv6 (notice brackets
[]around IP address):$ sftp ubuntu@[3001:700:2:8200::268f]
In some shells (zsh) you may need to escape the brackets, i.e.
[→\[, or put the whole argument in quotes.Advanced example using proxy host and specifying key, with IPv6, and also specifying remote directory:
$ sftp -i ~/.ssh/id_ed25519_nrec -J uiouser@login.uio.no ubuntu@[3001:700:2:8200::268f]:/data
Once you have opened an SFTP session, you can use common FTP commands. The most used are:
get remote-path [local-path] : Retrieve the remote-path and store it on the local machine. If the local path name is not specified, it is given the same name it has on the remote machine.
put local-path [remote-path] : Upload local-path and store it on the remote machine. If the remote path name is not specified, it is given the same name it has on the local machine.
lpwd : Print local working directory
pwd : Display remote working directory
lls [path] : Display local directory listing of either path or current directory if path is not specified.
ls [path] : Display a remote directory listing of either path or the current directory if path is not specified
lcd [path] : Change local directory to path. If path is not specified, then change directory to the local user’s home directory
cd [path] : Change remote directory to path. If path is not specified, then change directory to the one the session started in.
These are only the commands most commonly used. Refer to the manual page of sftp for the rest, as well as more advanced usage of these commands:
man sftp
Transferring directory recursively via RSYNC
Whenever you want to transfer an entire directory including its contents to or from your instance, rsync is a good tool for the job. If you’re not relying on proxy hosts or other exotic SSH options to make this work, you can use rsync very much like scp:
Rsync a directory to your instance from the local machine:
rsync -av <source-dir> <username>@<ip-address>:<target-dir>
And vice versa:
rsync -av <username>@<ip-address>:<source-dir> <target-dir>
We use the options -a for archive mode, that makes sure that
everything (permissions, owner etc.) is kept and the copy is as exact
as possible. The option -v triggers verbose mode and can be
omitted without altering the functionality.
Examples:
From local machine to instance using IPv4:
$ rsync -av /tmp/analysis ubuntu@258.37.63.217:/data/
And using IPv6:
$ rsync -av /tmp/analysis ubuntu@[3001:700:2:8200::268f]:/data/
In some shells (zsh) you may need to escape the brackets, i.e.
[→\[, or put the whole argument in quotes.From instance to local machine using IPv4:
$ rsync -av ubuntu@258.37.63.217:/data/results ~/thesis/
And using IPv6:
$ rsync -av ubuntu@[3001:700:2:8200::268f]:/data/results ~/thesis/
In some shells (zsh) you may need to escape the brackets, i.e.
[→\[, or put the whole argument in quotes.
If you rely on SSH proxy hosts to connect to the instance, you will
need to also use the option -e to specify the remote shell to
use. In our case, we want to use ssh with options for specifying the
key and proxy host.
Rsync a directory to your instance from the local machine:
rsync -av -e 'ssh -i <keyfile> -J <username>@<proxy-host>' <source-dir> <username>@<ip-address>:<target-dir>
And vice versa:
rsync -av -e 'ssh -i <keyfile> -J <username>@<proxy-host>' <username>@<ip-address>:<source-dir> <target-dir>
Examples:
From local machine to instance using IPv4:
$ rsync -av -e 'ssh -i ~/.ssh/id_ed25519_nrec -J uiouser@login.uio.no' /tmp/analysis ubuntu@258.37.63.217:/data/
And using IPv6:
$ rsync -av -e 'ssh -i ~/.ssh/id_ed25519_nrec -J uiouser@login.uio.no' /tmp/analysis ubuntu@[3001:700:2:8200::268f]:/data/
In some shells (zsh) you may need to escape the brackets, i.e.
[→\[, or put the whole argument in quotes.From instance to local machine using IPv4:
$ rsync -av -e 'ssh -i ~/.ssh/id_ed25519_nrec -J uiouser@login.uio.no' ubuntu@258.37.63.217:/data/results ~/thesis/
And using IPv6:
$ rsync -av -e 'ssh -i ~/.ssh/id_ed25519_nrec -J uiouser@login.uio.no' ubuntu@[3001:700:2:8200::268f]:/data/results ~/thesis/
In some shells (zsh) you may need to escape the brackets, i.e.
[→\[, or put the whole argument in quotes.
Deleting key pairs
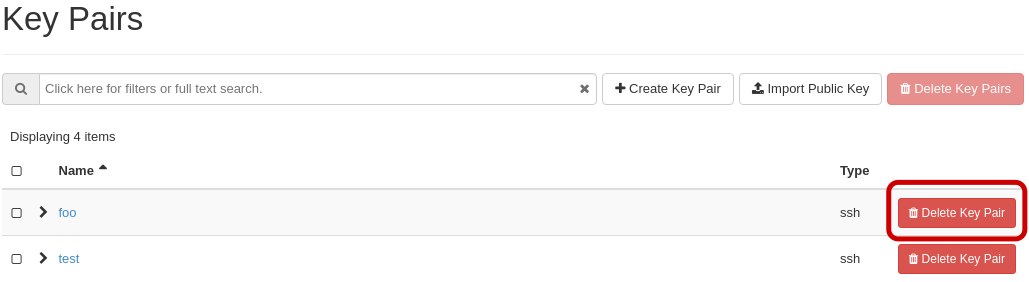
In order to delete a key pair in the GUI, navigate to Project -> Compute -> Key Pairs. In the list of key pairs use the Delete Key Pair button to delete the key, or select keys and use the Delete Key Pairs button on the top right:
Once a key pair is deleted, it is no longer accessible for use when provisioning new instances. Deleting a key pair will not affect running instances that uses that key pair.
Deleting a key pair using the CLI is done with this command:
openstack keypair delete [-h] <key> [<key> ...]
First we list our key pairs (this can be omitted if you know the name of the key pair you want to delete):
$ openstack keypair list
+-------+-------------------------------------------------+
| Name  | Fingerprint                                     |
+-------+-------------------------------------------------+
| bar   | 9d:b5:68:c9:d5:53:ab:73:95:f7:85:a2:74:a8:41:9e |
| foo   | 34:3c:b0:40:02:fa:2f:e4:6c:da:9f:7a:3b:44:23:34 |
| mykey | e2:2e:26:df:5d:98:9e:8f:5e:fd:c7:d5:d0:6b:44:e7 |
+-------+-------------------------------------------------+
Then we delete the key pair:
$ openstack keypair delete foo
You may specify more than one key pair to this command.
Caveats and limitations
There are a few caveats and limitations that you should be aware of when using creating and using SSH key pairs in NREC:
An SSH key pair in NREC follows the user-project-region combination. This differs from most attributes that does not have the user aspect. Due to the API/CLI user being a different user (albeit with the same username) as the GUI user, keys created in GUI are not visible in API/CLI, and vice versa.
It is possible to create an SSH key pair within the process of creating an instance. This doesn’t work properly. For best results, create the ssh key pair before creating the instance, as described in this document.