Create a Linux virtual machine
Last changed: 2024-04-17
SSH key pair
Virtual machines in NREC are accessed using SSH key pairs. If you don’t already have an SSH key pair, visit Creating a key pair in the document Using SSH. You need to have an SSH key pair in order to proceed.
Create a virtual machine
Once you have an SSH keypair defined, you can proceed with creating a virtual machine (instance). Navigate to Project -> Compute -> Instances:
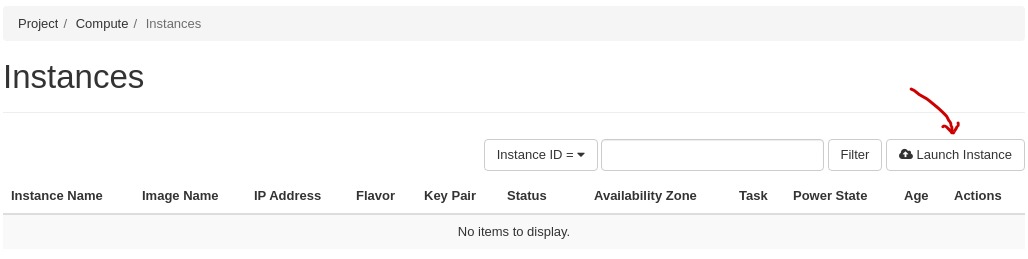
Click Launch Instance. The following window will appear:
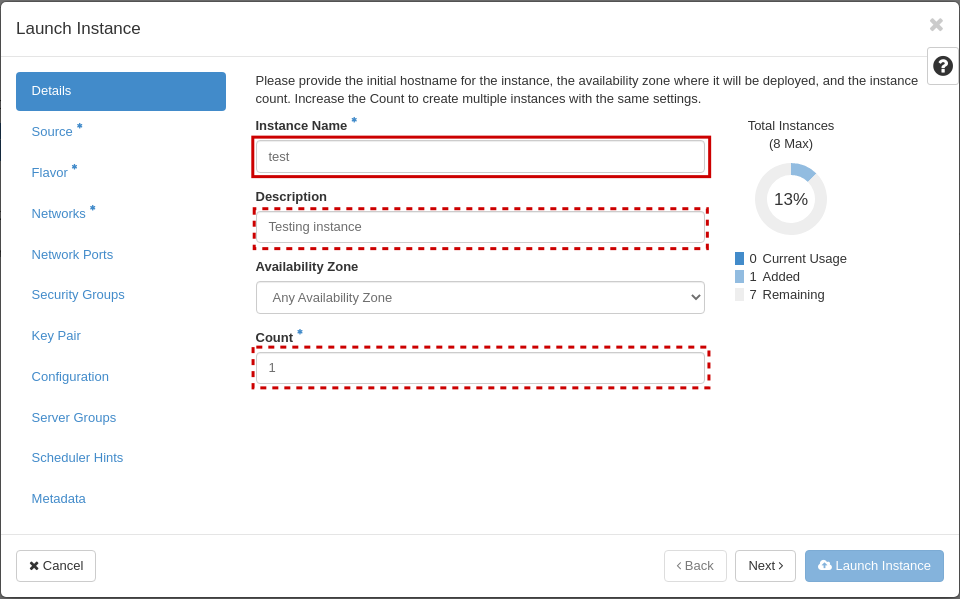
In this window, enter the following values:
Instance Name: Select a name for your new virtual machine
Description: Optionally set a description
Availability Zone: Leave this at its default value
Instance Count: How many virtual machines to create (usually only 1)
When finished with this tab, select the next, Source:
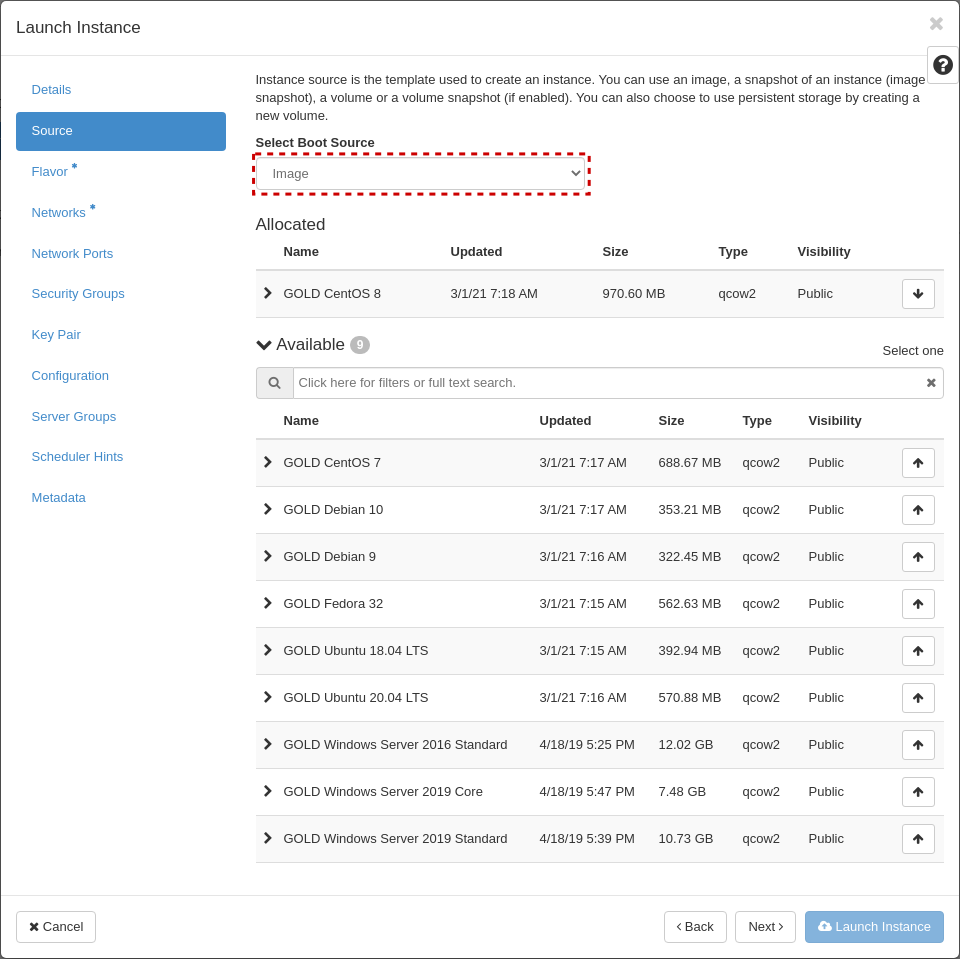
Select Boot Source should be left at “Image”, which is the default. In this case, the virtual machine will boot from a standard cloud image. When selecting this option, you can choose from a list of images. In our example, we have selected “GOLD CentOS 8”.
When finished with this tab, select the next, Flavor:
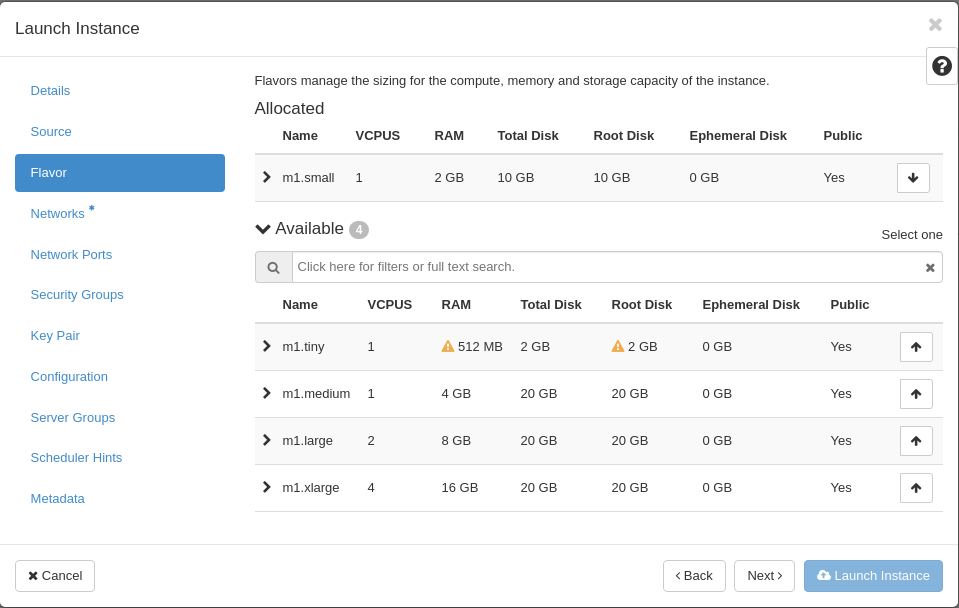
This is where you select the flavor for the virtual machine, i.e. a pre-defined set of compute resources. In our example, we’ve selected the “Small” flavor, which is just enough to run our CentOS instance.
When finished with this tab, select the next, “Networks”:

In NREC, there are two networks to choose from, “dualStack” and “IPv6”. Both networks provide a public IPv6 address, so the difference lays in IPv4.
IPv6 provides a “private” IPv4 address (RFC 1918), which gives the instance outbound IPv4 connectivity through NAT
dualStack provides a public IPv4 address and a public IPv6 address.
For more information, see IPv6 or dualStack.
Note
Only one network!
The instance will not work correctly if more than one network is applied. Only choose one of IPv6 or dualStack.
If unsure, choose IPv6. Our IPv4 address space is very limited. Login hosts at UiO and UiB have IPv6 configured, and can be used to manage your instances via IPv6.
When finished with this tab, select the “Security Groups” tab:
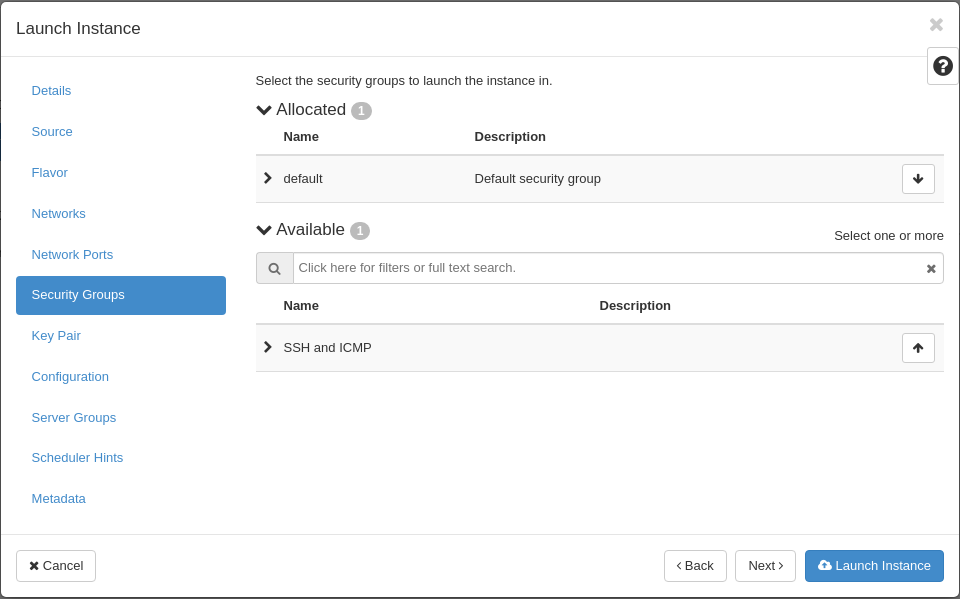
Here, select any Security Groups (i.e. IP filters) you want to add to the virtual machine. The default security group is already selected, and in our example we have another that we have created before. Choose which security groups should be applied to the instance. This can be also be edited at a later time. For more info, see the section Allowing SSH and ICMP access below.
When finished with this tab, select the Key Pairs tab:
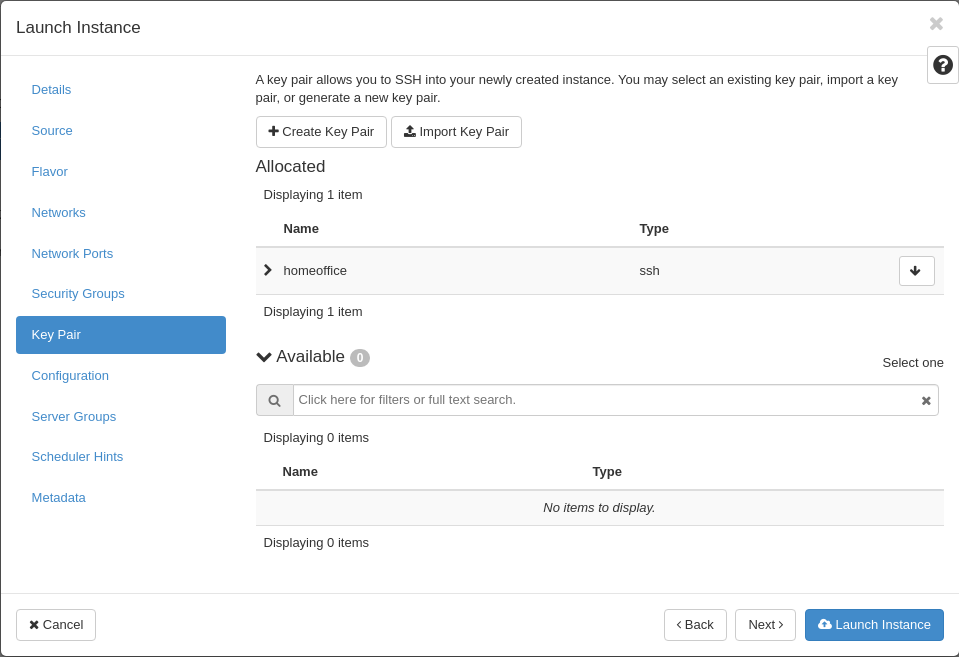
Here, choose which SSH keypair you want to assign to this virtual machine. Adding SSH public key to the instance is only done during instance creation and cannot be changed later.
When satisfied, clik “Launch” to create your virtual machine.
After a few moments, the virtual machine is up and running.
Allowing SSH and ICMP access
For more information about allowing access via security groups, visit Working with Security Groups.
In order to allow traffic to the virtual machine, you need to create a new security group which allows it, and attach that security group to the virtual machine. To create a new security group, navigate to the Project -> Network -> Security Groups:
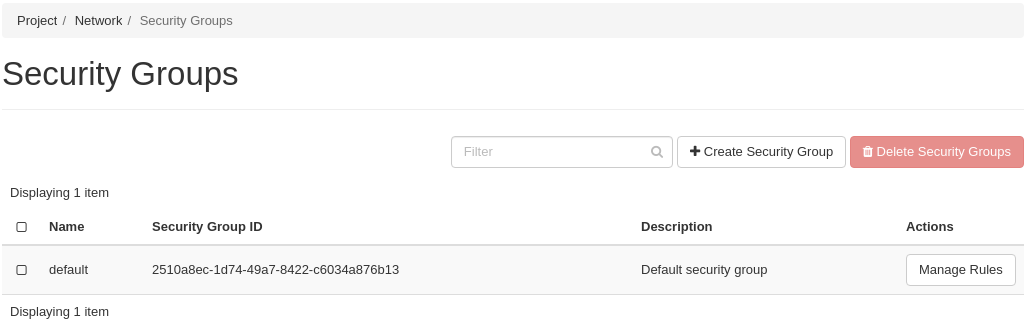
Click on Create Security Group:

Fill in a name for the new security group, and optionally a description. Then click Create Security Group. The dashboard will automatically navigate into where you are expected to manage the security group rules:
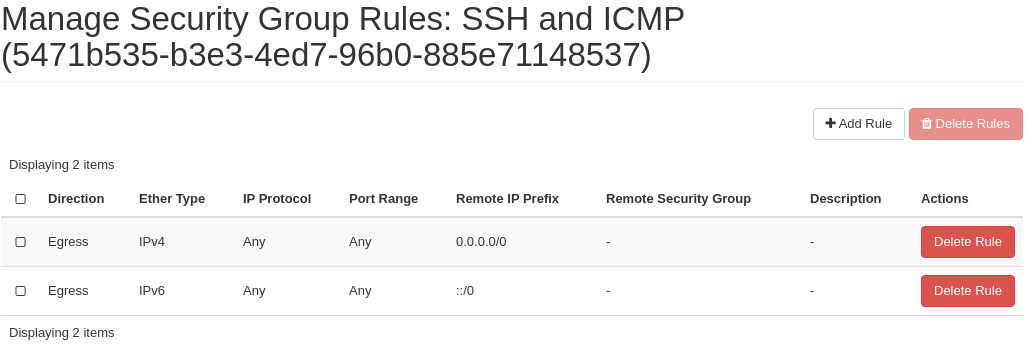
You want to add a couple of rules. Click “Add Rule”:
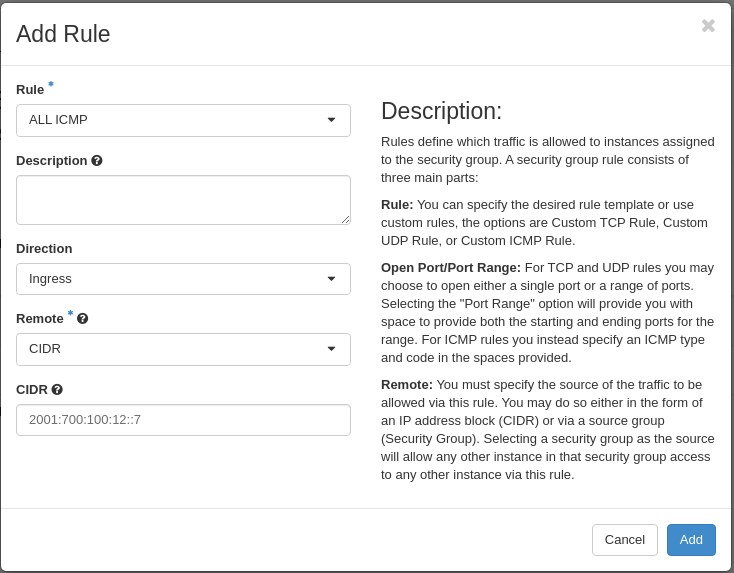
Select “ALL ICMP” from the drop-down menu under “Rule”. Leave the rest at its default and click Add. Repeat the process and select “SSH” from the “Rule” drop-down menu, and the result should be:
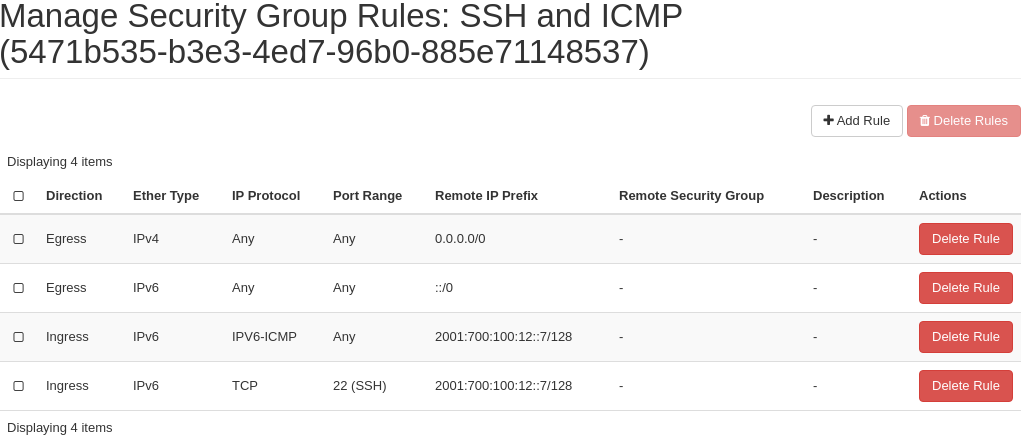
Note
In this case we are adding ICMP and SSH from a single machine (login.uio.no) via IPv6. You will have to repeat the process for the IPv4 address if you want to open for IPv4 as well.
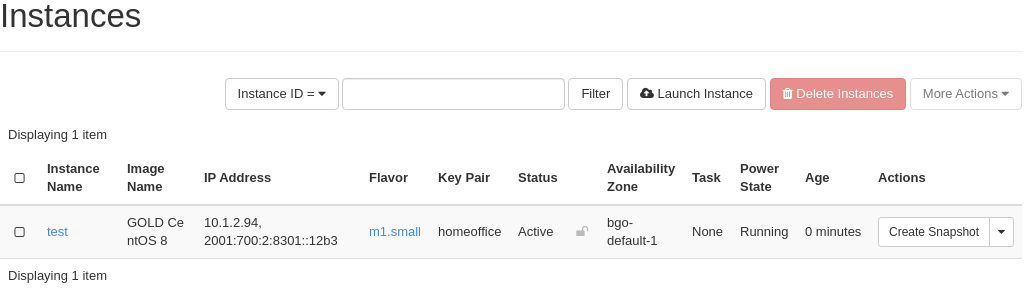
Navigate to Compute -> Instances, and use the drop-down menu to the right of your newly created virtual machine. Select Edit Security Groups:
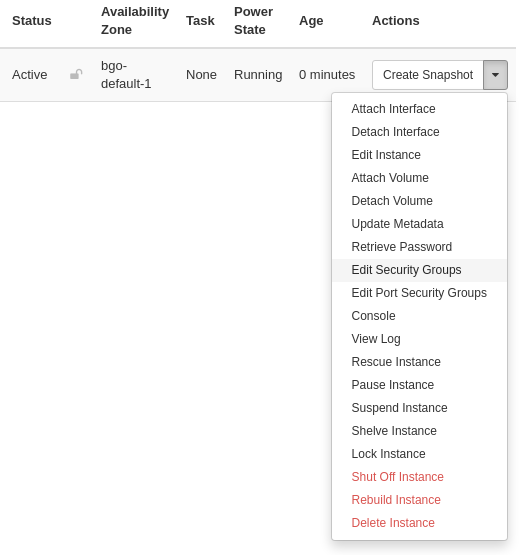
The following will appear:
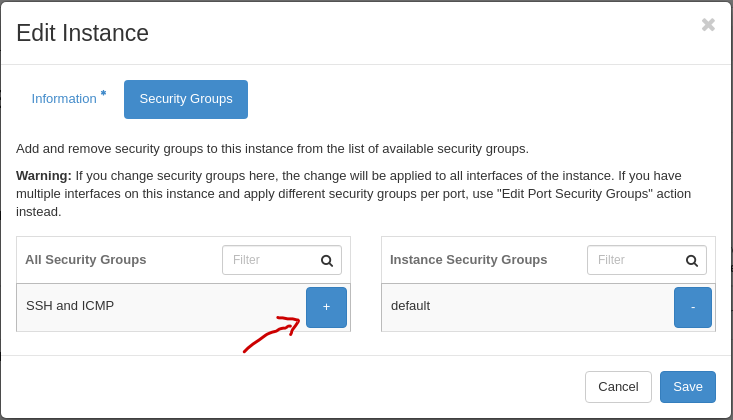
Add the “SSH and ICMP” security group and click Save.
Accessing the virtual machine
With a proper security group in place, the virtual machine is now reachable from the Internet:
$ ping6 2001:700:2:8301::1366
PING 2001:700:2:8301::1366(2001:700:2:8301::1366) 56 data bytes
64 bytes from 2001:700:2:8301::1366: icmp_seq=1 ttl=55 time=6.12 ms
64 bytes from 2001:700:2:8301::1366: icmp_seq=2 ttl=55 time=5.96 ms
64 bytes from 2001:700:2:8301::1366: icmp_seq=3 ttl=55 time=6.57 ms
64 bytes from 2001:700:2:8301::1366: icmp_seq=4 ttl=55 time=6.01 ms
^C
--- 2001:700:2:8301::1366 ping statistics ---
4 packets transmitted, 4 received, 0% packet loss, time 3002ms
rtt min/avg/max/mdev = 5.965/6.170/6.570/0.244 ms
You can log in to the virtual machine using the SSH key assigned to the virtual machine. For more information, visit Connecting to the instance in the document Using SSH.
Doing the same with CLI
For information on how to install the command line tools, check the section Installing the CLI tools.
Listing any existing servers, keypairs and security groups:
$ openstack server list
(...no output...)

$ openstack keypair list
(...no output...)

$ openstack security group list
+--------------------------------------+---------+------------------------+----------------------------------+------+
| ID                                   | Name    | Description            | Project                          | Tags |
+--------------------------------------+---------+------------------------+----------------------------------+------+
| 6743c744-1a06-462e-82e6-85c9d0b2399f | default | Default security group | 24823ac5a6dd4d27966310600abce54d | []   |
+--------------------------------------+---------+------------------------+----------------------------------+------+
In this example, we have no servers and keypairs, and our copy of the default security group.
Uploading an SSH key:
$ openstack keypair create --public-key ~/.ssh/id_ed25519.pub mykey
+-------------+-------------------------------------------------+
| Field       | Value                                           |
+-------------+-------------------------------------------------+
| fingerprint | e2:2e:26:7f:5d:98:9e:8f:5e:fd:c7:d5:d0:6b:44:e7 |
| name        | mykey                                           |
| user_id     | 6bb8dbcdc9b94fff89258094bc56a49f                |
+-------------+-------------------------------------------------+
Creating a security group:
$ openstack security group create --description "Allow incoming SSH and ICMP" SSH_and_ICMP
(...output omitted...)
Adding rules to the security group:
$ openstack security group rule create --ethertype IPv6 --protocol ipv6-icmp --remote-ip 2001:700:100:12::7 SSH_and_ICMP
(...output omitted...)

$ openstack security group rule create --ethertype IPv6 --protocol tcp --dst-port 22 --remote-ip 2001:700:100:12::7 SSH_and_ICMP
(...output omitted...)
Listing available images:
$ openstack image list --status active
+--------------------------------------+-----------------------------------+--------+
| ID                                   | Name                              | Status |
+--------------------------------------+-----------------------------------+--------+
| c1becb87-ab4f-4988-862e-f5be219755be | GOLD CentOS 7                     | active |
| cc8bee9f-b8e5-48c3-bc76-ba173a75b503 | GOLD CentOS 8                     | active |
| 86a0859e-1746-460f-abf7-2f53fe572163 | GOLD Debian 10                    | active |
| 7ecf8f33-9686-4207-86dc-89cf1946128c | GOLD Debian 9                     | active |
| a7ab8139-638a-464a-8fad-e2796a87729e | GOLD Fedora 32                    | active |
| ac68185f-de0f-47fa-b260-c60cb1d31e68 | GOLD Ubuntu 18.04 LTS             | active |
| 10f180ac-fb3f-47ff-9b3a-00115de56848 | GOLD Ubuntu 20.04 LTS             | active |
| b2d189c0-a5b4-4660-8007-555f34dcd4c4 | GOLD Windows Server 2016 Standard | active |
| b7047043-8d00-4ab5-8db5-8b2688d0d74b | GOLD Windows Server 2019 Core     | active |
| 72568f04-d909-4809-8b0a-279679c054de | GOLD Windows Server 2019 Standard | active |
+--------------------------------------+-----------------------------------+--------+
Listing available flavors:
$ openstack flavor list
+--------------------------------------+-----------+-------+------+-----------+-------+-----------+
| ID                                   | Name      |   RAM | Disk | Ephemeral | VCPUs | Is Public |
+--------------------------------------+-----------+-------+------+-----------+-------+-----------+
| 348dfae3-bf34-4286-8dd8-b700b25fc109 | m1.large  |  8192 |   20 |         0 |     2 | True      |
| 39351b5b-86db-4a12-bd68-dd5530de802d | m1.xlarge | 16384 |   20 |         0 |     4 | True      |
| 6877962f-41df-42b3-b955-f3a846bef179 | m1.tiny   |   512 |    2 |         0 |     1 | True      |
| b128b802-3d12-401d-bf51-878122c0e908 | m1.small  |  2048 |   10 |         0 |     1 | True      |
| c76cbbc9-df2d-4b8c-9587-b9b9bc232685 | m1.medium |  4096 |   20 |         0 |     1 | True      |
+--------------------------------------+-----------+-------+------+-----------+-------+-----------+
Listing available networks:
$ openstack network list -c ID -c Name
+--------------------------------------+-----------+
| ID                                   | Name      |
+--------------------------------------+-----------+
| 62421b56-346d-4794-99b0-fc27fe4e700f | IPv6      |
| c97fa886-592e-4ad1-a995-6d55651bed78 | dualStack |
+--------------------------------------+-----------+
Creating a server (instance):
$ openstack server create --image "GOLD CentOS 8" --flavor m1.small \
      --security-group SSH_and_ICMP --security-group default \
      --key-name mykey --nic net-id=IPv6 myserver
+-----------------------------+------------------------------------------------------+
| Field                       | Value                                                |
+-----------------------------+------------------------------------------------------+
| OS-DCF:diskConfig           | MANUAL                                               |
| OS-EXT-AZ:availability_zone | osl-default-1                                        |
| OS-EXT-STS:power_state      | NOSTATE                                              |
| OS-EXT-STS:task_state       | scheduling                                           |
| OS-EXT-STS:vm_state         | building                                             |
| OS-SRV-USG:launched_at      | None                                                 |
| OS-SRV-USG:terminated_at    | None                                                 |
| accessIPv4                  |                                                      |
| accessIPv6                  |                                                      |
| addresses                   |                                                      |
| adminPass                   | BHb84gEEks3F                                         |
| config_drive                |                                                      |
| created                     | 2021-03-15T13:28:06Z                                 |
| flavor                      | m1.small (b128b802-3d12-401d-bf51-878122c0e908)      |
| hostId                      |                                                      |
| id                          | 9fb1f289-81ae-4b6d-be52-995434ab9978                 |
| image                       | GOLD CentOS 8 (cc8bee9f-b8e5-48c3-bc76-ba173a75b503) |
| key_name                    | mykey                                                |
| name                        | myserver                                             |
| progress                    | 0                                                    |
| project_id                  | 24823ac5a6dd4d27966310600abce54d                     |
| properties                  |                                                      |
| security_groups             | name='00b69714-0378-46dc-bd3e-718a93b5188d'          |
|                             | name='6743c744-1a06-462e-82e6-85c9d0b2399f'          |
| status                      | BUILD                                                |
| updated                     | 2021-03-15T13:28:06Z                                 |
| user_id                     | 6bb8dbcdc9b94fff89258094bc56a49f                     |
| volumes_attached            |                                                      |
+-----------------------------+------------------------------------------------------+
Listing servers:
$ openstack server list
+--------------------------------------+----------+--------+----------------------------------------+---------------+----------+
| ID                                   | Name     | Status | Networks                               | Image         | Flavor   |
+--------------------------------------+----------+--------+----------------------------------------+---------------+----------+
| 9fb1f289-81ae-4b6d-be52-995434ab9978 | myserver | ACTIVE | IPv6=2001:700:2:8201::13f2, 10.2.2.104 | GOLD CentOS 8 | m1.small |
+--------------------------------------+----------+--------+----------------------------------------+---------------+----------+